支持的设备
| Device Type | Modbus TCP (Ethernet) | RS485 |
|---|---|---|
| Inepro PRO380 | ❌ | ✅ |
接线
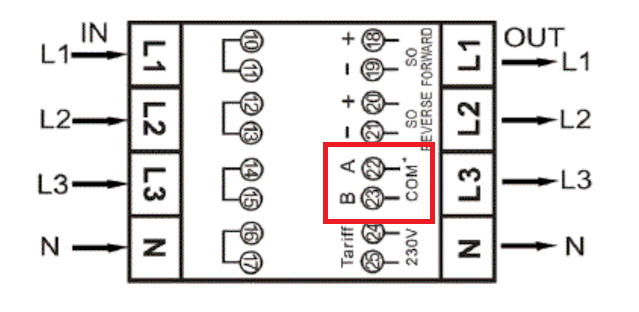
RS485
RS485 Wiring
- For correct RS485 wiring: Follow the guidelines for RS485 wiring.
- If the wiring shown in the table below is incorrect, please let us know.
- There is no general consensus in the industry about the usage of A and B for the RS485 polarity, so it may be counterintuitive and opposite of what you might expect for some devices.
| Device | DemoBrandName ControllerDemoName model OM1 | DemoBrandName ControllerDemoName model IG8 | RS485-USB converter | RS485-Ethernet converter |
|---|---|---|---|---|
| A (引脚 22) | RS485 A | RS485_POS | RS485 A | TX+ |
| B (引脚 23) | RS485 B | RS485_NEG | RS485 B | TX- |
| 不适用 | RS GND | GND | Not available | G |
配置
NOTE: RS485 Device Addresses
- You MUST give each device on the RS485 bus a unique address. Check the manual of the device on how to do this.
- Use lower addresses first (1, 2, ...) because the DemoBrandName ControllerDemoName will find them faster!
- For each device, it is generally recommended to stick with the factory default baud rate, parity, and stop bits. The DemoBrandName ControllerDemoName will scan on those first.
请参考仪表手册以获取有关更改 Modbus 地址的更多详细信息。 默认情况下,仪表设置为地址 1。可以通过仪表显示进行更改。
- 使用按钮进入程序模式 2。
- 按住右侧按钮 3 秒以打开菜单。
- 滚动到 LCD 页面 Modbus/M-bus ID (地址 xxx)。
- 按住右侧按钮 5 秒进入编程模式。
- 值开始闪烁:选择 3 位数字 (Modbus: 001-247)。通过同时按住两个按钮 3 秒来确认每个数字。
- 当设置被确认时,LCD 显示 OK。
